|
||||
| Correcting badly designed mole traps. | ||||
| Scissor mole traps. | ||||
| It is no good learning how to set a trap unless you have a trap that is perfect for the job. | ||||
|
Firms that get manufacturers to make mole traps like the traps that I show that need altering, have not got a clue on the setting of a mole trap. It is not normally the manufacturers that are at fault but the firms that authorise the making of the traps when they only have half a clue on how a trap works. |
||||
|
It is most important to learn how a trap works. It may need a spot of oil on it. The wire holding the setting ring may need changing. The legs may need bending and or welding. |
||||
| All scissor mole traps should look similar to the 1950's trap for successful mole catching. | ||||
 |
 |
|||
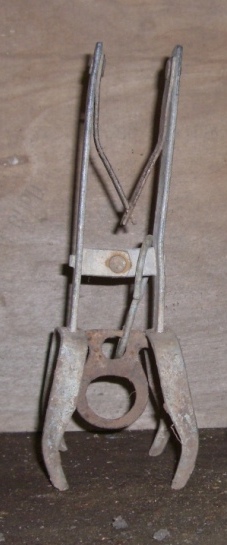
| Trap bought in the 1950's which did not need any modification and is still being used. In fact 4 traps were bought and 4 traps are still in use. | This type of trap that when the legs are curved will look similar to the 1950's trap. This trap has several names. The "Eliza Tinsley or No. 1402 Trap" and probably other names. | |||
| Traps with the wire holding the setting ring, going round the centre between the trap handles is the ideal design. | ||||
| ------------------------ | ||||
|
How to convert an "Eliza Tinsley Scissor Mole Trap" or a "No. 1402 Scissor Mole Trap" to make them catch moles. |
||||
| At the present time, in my opinion, this is the only trap that is worth buying. | ||||
|
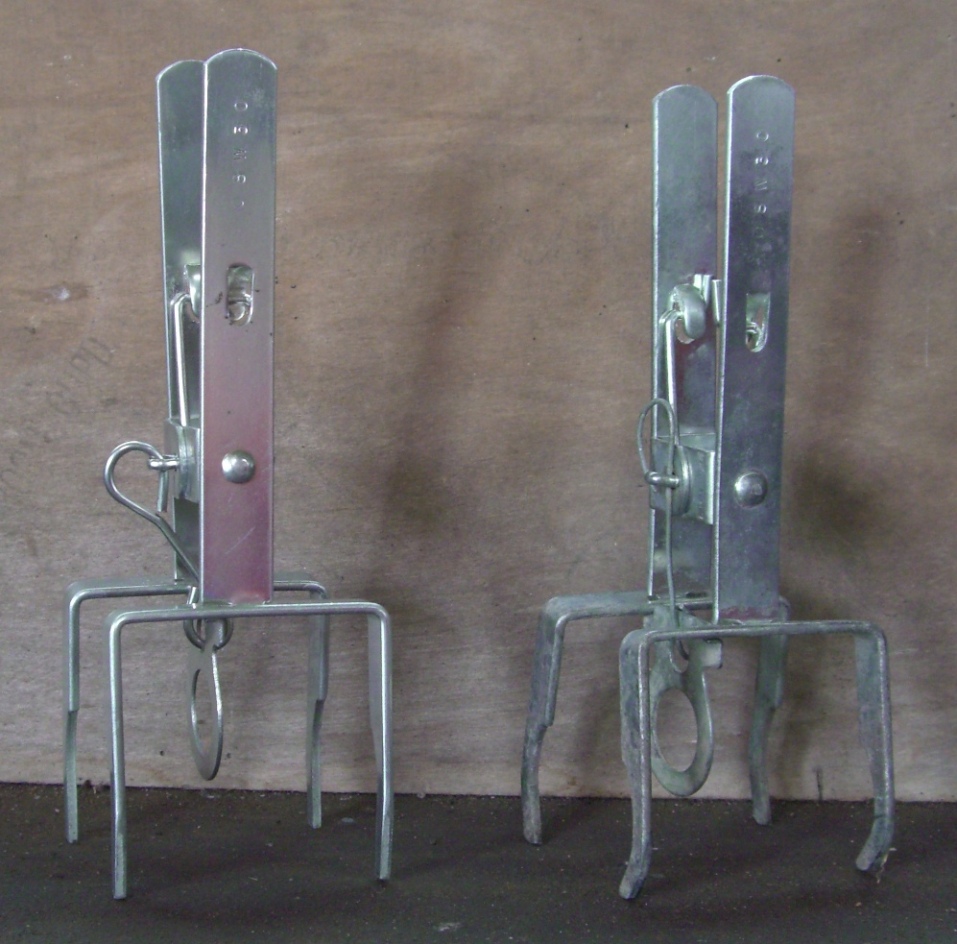
Some of the reasons for the conversion, by putting a curve on the legs of the trap, widening the legs and grinding off the bottom outside corners of the legs, is that the mole will be able to enter the trap more easily and the trap will slide along the bottom of the mole run and close faster, for excellent mole catching results. |
||||
|
|
|
|||
|
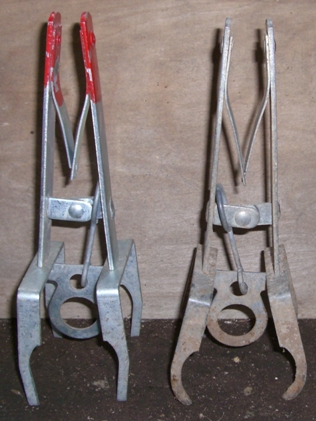
The trap on the right of the pictures are as bought and needs to be altered to allow the mole easier access. |
||||
|
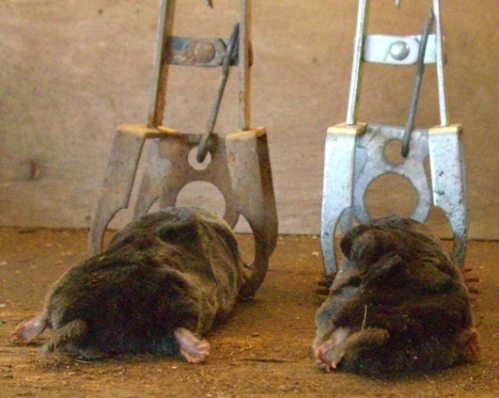
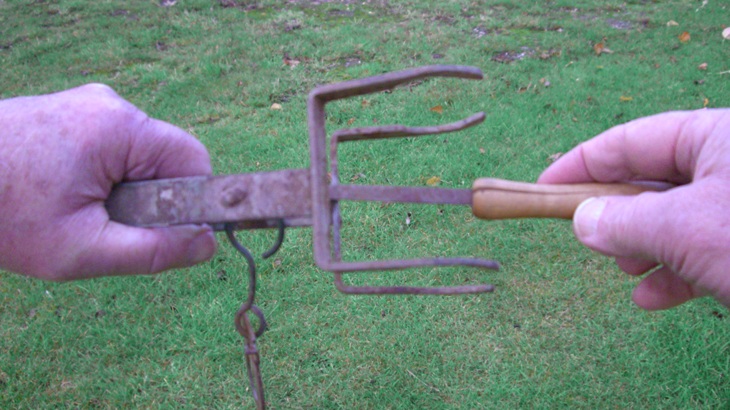
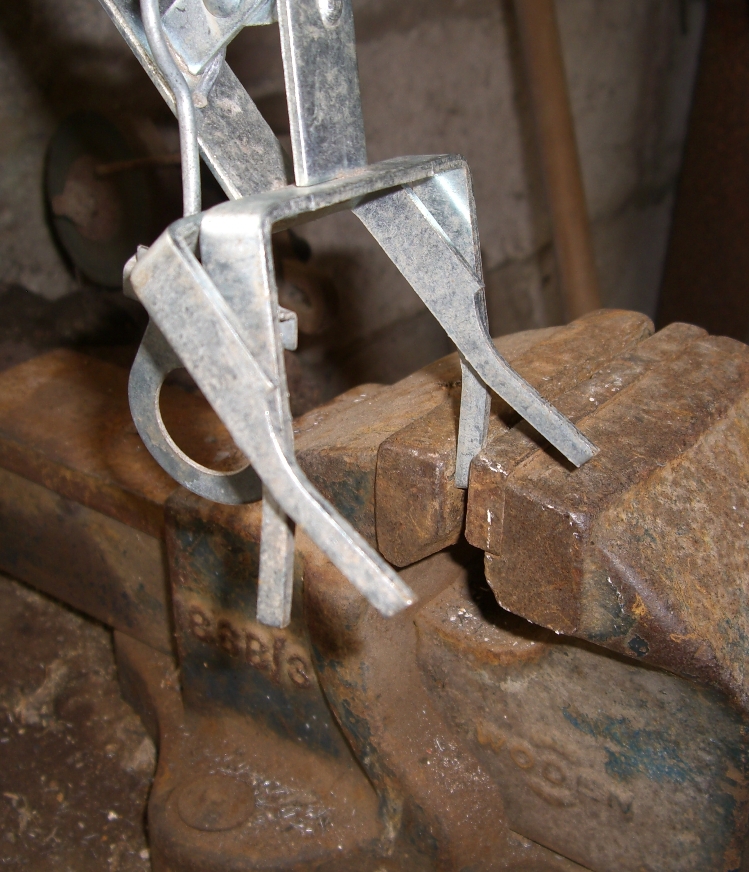
Look at the picture below because there is another huge advantage in mole catching with a converted trap, especially when the ground is wet. Notice the legs are bent outwards compared with the trap before the conversion. This helps to support the trap against the sides of the mole run and stops the trap sinking into the base of the mole run when ground is wet. This allows the trap to close fast when triggered. The trap must always be set in a tight fitting mole run. |
||||
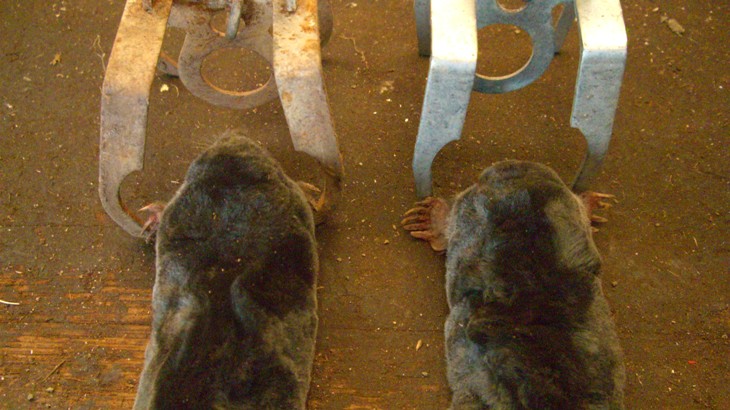
|
|
||||
|
The trap on the right, in my opinion, is one of the best mole traps that you can buy because the legs are welded to the handles and the wire to the setting ring is normally correct. The trap needs to be modified to look like the trap on the left. This converted shape of trap has far more advantages than other traps on the market and with no disadvantages. Other people will disagree with me because the only knowledge they have is the trap without the conversion. I have read that there are disadvantages to these traps which I find are untrue or meaningless when they have been converted and set to the instructions as shown on this website. |
||||
|
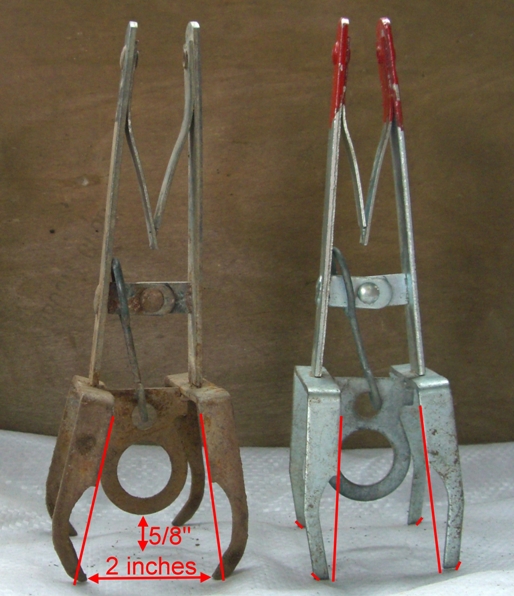
The alterations are |
||||
|
1. The bottom of the legs are curved slightly inwards. Note the inside edge of the wider part of the leg at the top, and taking a straight line downwards, you will see that the curve at the bottom of the leg would be slightly passed that line. |
||||
|
2. The legs are then prised outwards to make the trap wider. The bend actually happens where the handles meet the legs of the trap. The measurements being around 2" in width at the tips of the legs and the setting ring is 5/8" above on a flat surface. |
||||
|
3. Round off the bottom outside corners of the legs with a file to make a slight curve as shown by the small red lines. Do not file much away to maintain as much width as possible so that it is not looking like a point. |
||||
|
------------------------------------ |
||||
|
This trap was exactly the same as the previous picture above but the alterations show how not to do it. Picture sent to me by email. |
 |
|||
|
------------------------------------ |
||||
|
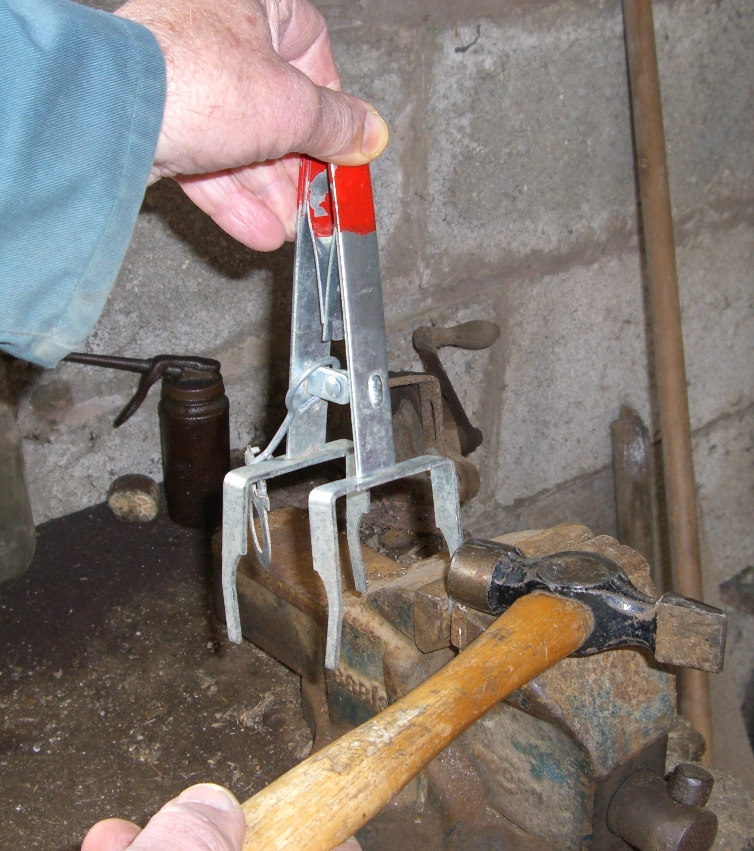
To put a curve on the legs of the trap. |
||||
 |
 |
|||
|
Only put the very end of each leg into the vice and hold the trap handles together. With a little pressure on the handles, pushing away from the hammer which is hitting the bottom of the leg with some force. The leg needs to have a small curve at the very bottom of the leg. Make sure the leg is bending near the vice and not higher up. Only do this if the trap handles are welded. Please read the article above for more accurate information. |
||||
|
To make this job easier, heat the tips of the legs for easy bending. |
||||
|
Email received 20/05/2010 France |
||||
|
When I moved to France several years ago I brought with me one new "welded" scissors trap. We have a large garden - about 100 yards x50 yards - which is constantly inhabited by mole(s,) probably because adjacent land is the site of a lake? My sporadic and incompetent efforts at eradication proved absolutely hopeless. |
||||
|
Eventually I found your excellent web site a few days ago, I thoroughly enjoyed reading your superbly illustrated comments. You are too kind! The others seem to SELL such information on dvd... and only in conjunction with their DIY equipment kit. |
||||
|
I modified my trap as you instruct and carried out your siting recommendations to the letter. The following morning, I ( more accurately, you) had caught our first mole. My French neighbour was mightily impressed! |
||||
 |
||||
|
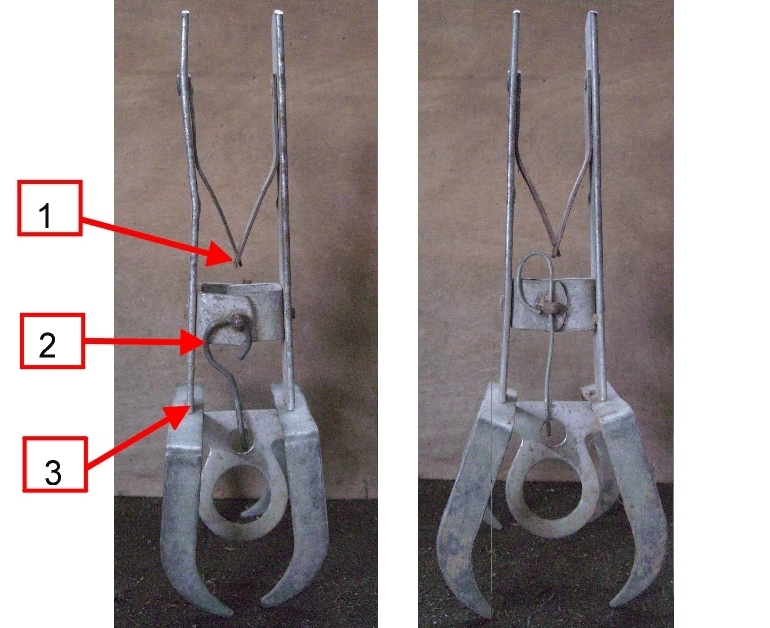
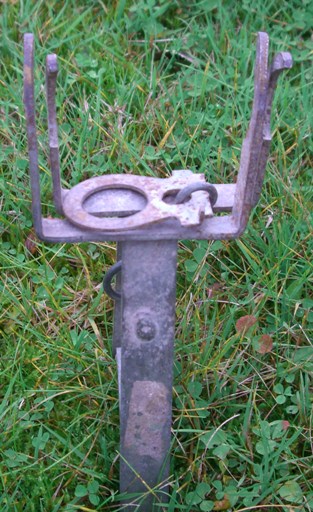
This particular mole trap, "The Big Cheese Mole Claw Trap" or the "Defenders Mole Claw Trap" which is different from the one above, needs a lot more work on it. |
||||
|
I would not recommend anyone to buy it, as you will find it far easier to go and buy a different type of trap than do the conversion. |
||||
| All mole traps however bad I say the design is, will catch moles but with a very low percentage rate of traps set. This website has been designed to show the best design of trap for trouble free mole catching, based on 50 years of experience. | ||||
| The shape of wire holding the setting ring will create problems when trying to catch moles. | ||||
|
|
||||
|
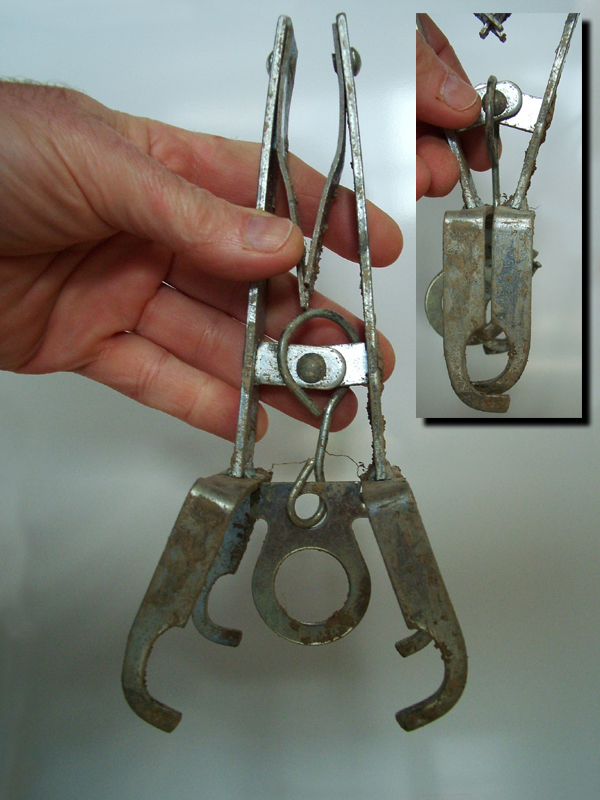
Before you make any alterations, can you set the setting ring in the middle of the trap without it touching the joint where the handles join the legs of the trap. The setting ring has been designed incorrectly for this type of trap. |
||||
|
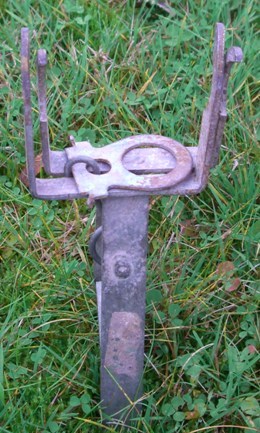
The trap on the right was exactly the same as the one one the left, but I have modified the legs, as shown by bending the legs and grinding off the outside corners so they will slide along the ground easier when the trap is set off. I had to clamp the legs of the trap in a vice, in order to put a curve on the legs. This procedure also lowers the setting ring nearer to the ground. The setting ring on the new unaltered trap is too high. |
||||
|
The wire holding the setting ring on the left trap in the picture, is the wrong shape for trouble free mole catching. This has been a problem that I have noticed on other traps for the past twenty years. It is most important to get it right, if you want to eliminate problems of catching moles. |
||||
|
The end of the wire must be D-shaped and not a round shape if it is fixed through the head of a cotter pin. The straight edge of the D-shape end will drop down through the cotter pin, if the wire is long enough, and allow the setting ring of the trap to get out of the way of the legs when the mole sets off the trap. The loops on the wire must be at right angles to one another. Using a thinner piece of wire to make the alterations is the best way of doing it. The hole in the centre of the cotter pin must face vertically. |
||||
|
Another problem with these traps, is that the handles come loose where they join the legs of the trap and a hammer and chisel is needed to tighten them up, and if that doesn't work, you will have to weld it. The best design is when the handles are welded to the legs of the trap. |
||||
|
Another view of the picture above. |
||||
|
|
||||
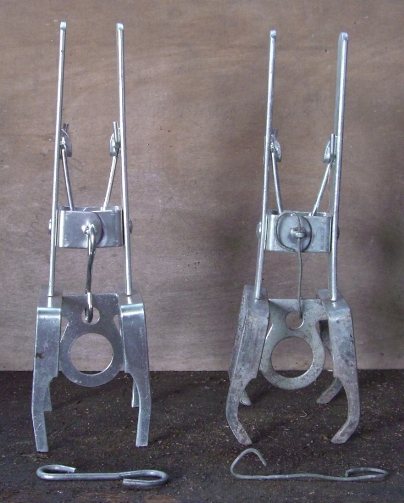
|
The trap on the left, the wire holding the setting ring is on an angle when the trap is set. When the trap is triggered, the wire has to swing sideways into a straighter position, in order for the setting ring to drop down. If the mole enters the trap from the left-hand side, the setting ring cannot always drop down as the wire is often too short because of its shape.. "It is essential to change the wire on this type of trap, to alleviate the problem of the setting ring getting caught in the legs of the trap." |
||||
|
The trap on the right, which has been modified, the wire holding the setting ring will drop straight down when the trap is set off. The loop at the top of the wire does not stick outwards which makes it easier to add matted grass when setting the trap in a mole run. |
||||
|
Traps that I have measured, the length of the legs are 3 inches before the conversion and after the legs have curved, the length of the legs are around 2 ¾ inches. |
||||
| Email received 24/12/2011 Northumberland | ||||
|
We moved into our lovely new house with stunning views of Northumberland and our back garden backs onto open farmland. Having noticed mole hills in the fields it was not long before they started appearing in my garden. Knowing nothing about catching moles I consulted the internet and tried various deterrents, such as, vibrating probes, human traps, jeyes fluid and everything in between, all to no avail. My garden was becoming more like the Somme by the day and I was beside myself as to what to do. I was fortunate in that I saw your web site and having bought a "Defender" mole trap set about following your instructions. Being an Engineer it was evident that what you were saying about the design of the traps was correct, therefore I modified the trap as per your instructions. I assembled the tools as instructed and placed the trap yesterday afternoon and was over the moon this morning to find the trap had been tripped and the mole caught. I am sure it will not be the last mole to enter my garden but I now feel able to effectively deal with them and although only an apprentice in mole catching I will hone my skills following your guidance. Thanks ever so much for explaining the art of mole catching as it is clear that the trap manufacturers are not interested in actually catching anything. |
||||
|
The wire holding the setting ring on a 1980's trap was completely the wrong length and shape for mole catching. The wire was so short that the setting ring could not drop down. |
||||
|
|
||||
|
The trap on the right was identical to the trap on the left when bought. |
||||
| 1. Oil the spring and hinge. Traps have a flat or a coiled spring. Springs on all scissor traps need oiling, even when the trap is brand new. It makes the setting ring trigger easier. I use WD40, making sure that I hold the trap in such away that the oil does not run onto the legs. | ||||
| 2. Change the wire, as shown previously. | ||||
| 3. The setting ring on the trap will not automatically set the legs the right width for catching moles. If the legs are too close as shown, bend them outwards to around 1¾ inches in width for this type of trap. Do not heat the trap to bend it. If you look at the two pictures above, the bend has actually occurred where the handles meet the legs of the trap. It has always been normal practice to bend the legs outward if they are too close. Where the handles are fixed to the legs of the trap, this joint must be solid and not loose. A problem can occur if they are not welded. | ||||
|
These instructions will apply to other similar type mole traps. |
||||
|
Once you have a mole trap with none of these problems, and the soil is not too wet, catching moles is quick and easy. |
||||
| --------------------------------- | ||||
|
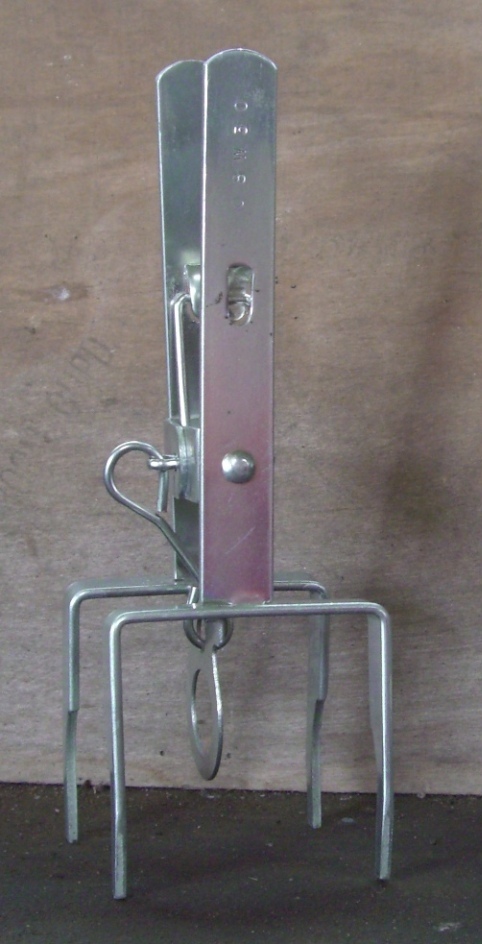
The wire holding the setting ring must be the right shape and length. |
||||
 |
 |
|||
|
To have the right shape and length of wire holding the setting ring, then the setting ring must be able to lie flat to the left and to the right, as shown in the pictures. |
||||
|
Setting rings that will not lie flat in any direction, normally means that the wire going through the hole on the setting ring is not a round loop. |
||||
|
Setting rings that lie flat in one direction only normally means that the end of the wire going through the hole in the setting ring is correct but the other end of the wire where it is fixed to the trap will have the wrong shape loop on it. |
||||
|
The wire holding the setting ring can also be too long and too short which prevents the setting ring to be correctly set in the middle of the trap. |
||||
|
For the last 60 years, some manufacturers have produced traps with the wire the wrong shape. A lot of mole trap manufacturers, wholesalers, and retailers do not know the ideal workings of a mole trap. I hope this website is giving you the opportunity to correct the problems if you have traps that need to be altered or are aware of the problems before buying new traps. |
||||
|
Trap Maintenance. |
||||
|
|
||||
|
Old and new traps need a file on the area where the setting ring is set if the metal is rough. This helps the mole to trigger the trap quicker. |
||||
|
Smooth off the area where the setting ring is set, with a file. Also use the file on the setting ring. This helps the mole to dislodge the setting ring with a lot less force. |
||||
|
You can test the difference it makes before you file off any rust etc. by setting the trap. While you are holding the handles in one hand, use your other hand to move the setting ring sideways and see how much pressure is needed to set off the trap. Now file off any rust or rough edges, set the trap and do the test again to see the improvement that has been made. These small details help to make a perfect trap for mole catching. |
||||
|
------------------------------ |
||||
|
Setting Rings |
||||
|
|
||||
|
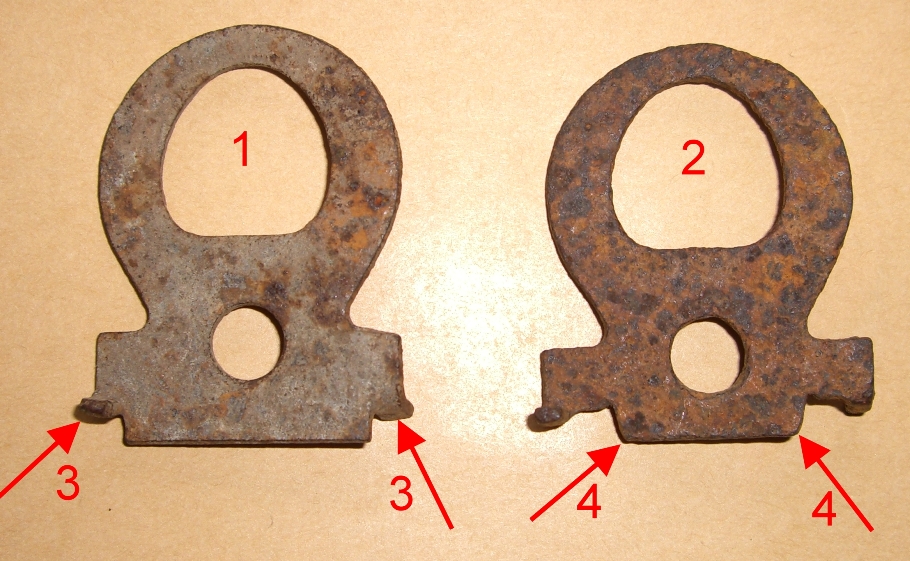
1. The setting rings must have bits of metal, called lugs, going in opposite directions, sticking out from the setting ring at no. 3. These can be bent downwards, towards the bottom edge in the picture slightly, for the trap to go off quicker. If the lugs are slightly bent over, which I have found on some new traps, then this is known as setting it lightly. I have never found it helpful to set the trap lightly as the trap can tend go off while trying to set the trap in the mole run. I will bend the lugs more so they are at right angles to the setting ring. A pair of pliers is needed to bend them. |
||||
|
2. This is a well worn setting ring. Notice how short the bottom edge is, compared with setting ring no.1. Traps that are used a lot, you will find that the corners at no. 4 become rounded. These corners need to be at right angles, as in setting ring no. 1. A lot of filing has been done over 40 years to have a right angle corner. This setting ring is not going to be used again as the spring on the trap has broken. Ideally a new setting ring would have been better 20 years ago, but I have never found anybody who sold them separately. |
||||
|
------------------------------ |
||||
| Webpage designed and produced by | ||||
| John Finnemore, Walcote Farm, Warwickshire. | ||||